InstatOnline
In order to collect data for Intrastat, the Ministry of Finance - General Directorate of Customs Administration in cooperation with the Czech Statistical Office developed a program called InstatOnline.
Data to be transmitted (collected) can be entered either manually or imported to InstatOnline application from other programs or systems but this import file has to be in compliance with the format specified by the Customs Administration. It is a CSV (Comma Separated Values) file and it is published on the website of the Czech Customs Administration.
InstatOnline includes functionality for verifying the validity of data on the input and then checking the data sent to the server. It is very important to pay attention to the process of sending data and then verifying if the data are accepted. There is a wide range of auxiliary functions that can facilitate reporting and are described in the manual.
For providing support for technical questions about using the application the General Customs Directorate established the Helpdesk for Intrastat based in Olomouc, which is available on working days from 7.00 to 15.30 at the tel. number 261 331 997 and at the time of data collection except of working hours at the tel. number 725 101 542. Questions can also be sent to email intrastat@cs.mfcr.cz. An actual information on technical issues can be found here customs administration website (hereinafter CAW) in the main menu "Other competencies" and submenu "Intrastat". Questions regarding the methodology can be directed to the site of the Czech Statistical Office.
Although the program has been tested the Czech Statistical Office and the General Directorate of Customs have no responsibility for the program and subsequent problems and exclude liability for any damages. If you have any problems using the application or if there are errors contact the Intrastat Helpdesk.
The aim of this documentation is helping you using the program InstatOnline.
1. Application suitability
The application is designed for small and medium businesses. There are some disadvantages resulting from the technology used i.e. slower processing of entered data (particularly in the days of culmination of the data collection - 10th - 12th working day) and the limited number of rows for import files (only 500 records). The advantage is the ability to run on any computer with a browser, no installation and always updated codes. An alternative for "larger companies" (with many records) is the application InstatDesk-CZ.
2. Requirements for reporting
2.1 System requirements
You only need a current computer with an Internet browser. The InstatOnline application has been tested on Microsoft Internet Explorer and Edge, Mozilla Firefox and Google Chrome.
2.2 Requirements for registration
After meeting the legal conditions for reporting Intrastat it is necessary to register at the respective Customs Office(for foreign persons registered to VAT at the Tax Office for Prague 1 it is Customs Office for Capital City Prague , Praha Hostiva�, K Hru�ovu 2/293, Praha 10 (e-mail: intra510000@cs.mfcr.cz or podatelna510000@cs.mfcr.cz). This is done by using registration form, which is located at CAW (Customs Administration Website) in the section "Documents and informations for Intrastat respondents" From a technical point of view it is the authorization of the username (email address) for the reporting of Intrastat declarations for the given VAT number. (You are registered in our Intrastat users DB.) After authorizing your email address you can retrieve your password by using the CAW to obtain a new or renew a forgotten password here. Authorized e-mail address and password are essential for sending data.
3. How to log into the application, registration details and password
3.1 Entering the application
You can enter the application through the menu on our web: the menu "Applications" and "InstatOnline".

Pic. 1. Entry to InstatOnline
If you're not logged into the CAW you will be prompted to enter your login email and password. In case you are already logged in to our CAW (see 3.2) you can enter the application directly.
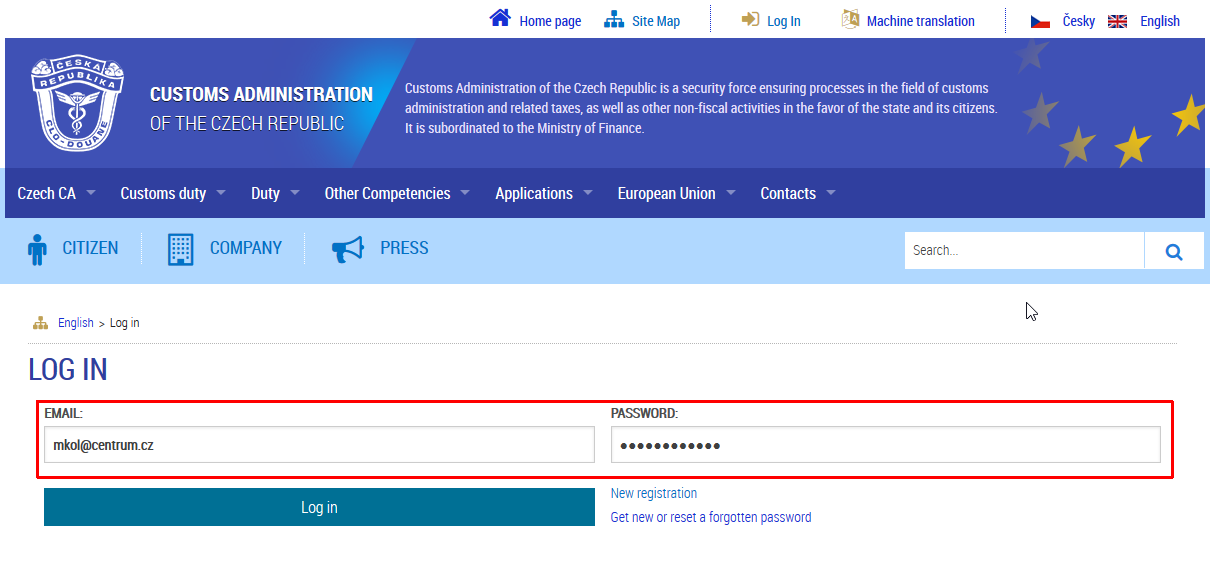
Pic. 2. Login to the application InstatOnline
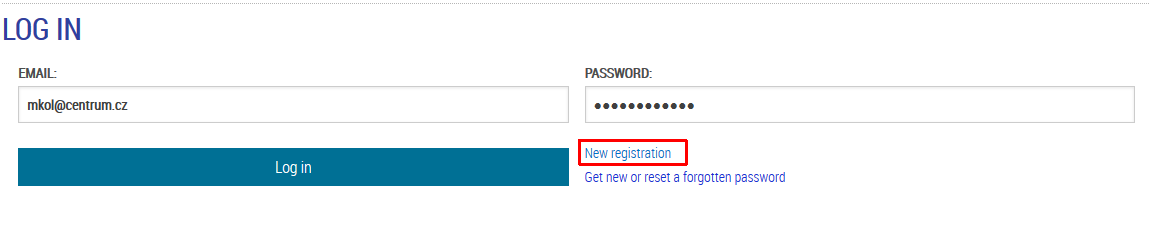
If you are entering the application for the first time or if you are not sure that you enter the correct password, use the "Get a new or reset a forgotten password" link from the previous picture or use the link here.
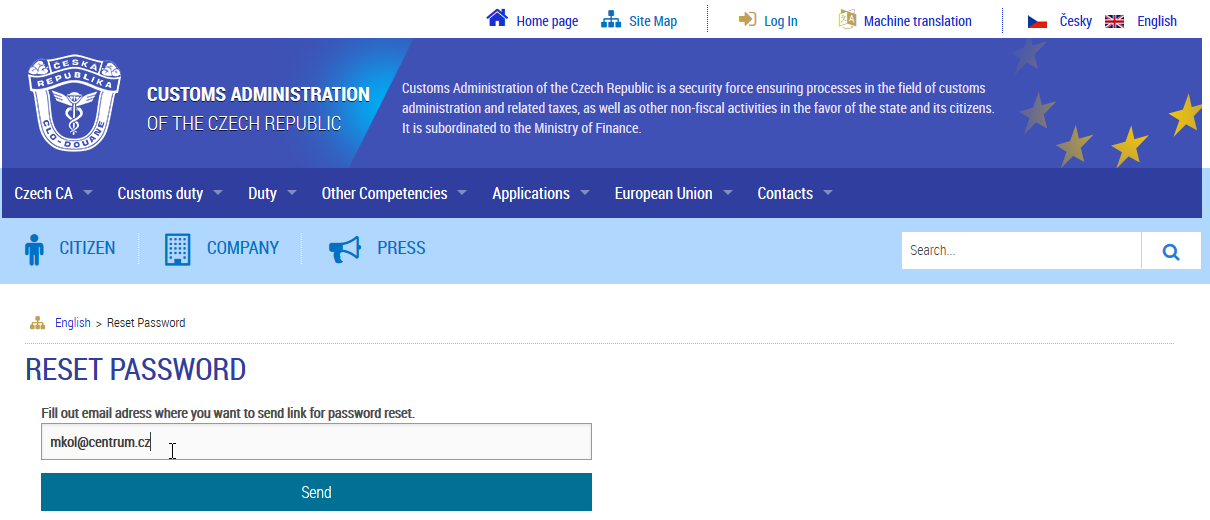
Pic. 3. Request for a new password
You will be sent the email with the link to change your password. Click on it to display the dialogue for setting your password.

Pic. 4. The link from your email to change your password
The dialogue for a password change displays the criteria for a password. The password should not also contain a name similar to the name of your company or email.

Pic. 5. Dialogue of a password change (setting)
If the password is successfully changed you will see the message:

Pic. 6. Password was changed successfully
3.2 Login to the CAW and editing of the company name
You can log in to the CAW (Customs Administration Website) before entering InstatOnline by clicking the icon link for a login.

Pic. 7. Link to log into the CAW
By clicking on the link you will get to the same "login dialogue" as in (3.1.)
Pic. 8. Log in
You can also select "New registration" in this form to register a new account on our CAW but the created account must be authorized by the respective Customs Office by sending the Request for electronic communication with Customs office (for Intrastat). So the Customs office will do the registration for you and thus there is no need to do a "New registration".

Pic. 9. Logged in user "log out" option added
By clicking on the logged-in user icon the user profile opens where you can change your password and the name of the account - it is usually your own name or a company name. The name is insignificant for Customs administration regarding the Intrastat because it is only a user profile name but if you want you can change it.

Pic. 10. Your user profile name can be arbitrary

Pic. 11. By clicking on the icon of the logged in user you can change your profile
3.3 Logging out
You can log out any time by clicking on the text "Log out" next to the logged in user name (see Pic. 11). If you are not using the application for some time you will be logged out automatically for the security reasons.
3.4 Summary
When you log in you always log in to our CAW. On our CAW you can create many accounts but if these accounts are not authorized by the Customs administration in response to the Request for electronic communication with the Customs office (for Intrastat), you cannot access the application with this account. For example if your account is not authorized by the Customs administration for Intrastat and you try to enter the application you will get the message "You have insufficient rights to access the InstatOnline application. Contact Intrastat Helpdesk". If you do not have an account on our CAW and you send the Request for electronic communication with the Customs office the Customs administration will create your account for you. Then just set your password (see Section 3.1 Pic. 3).
4. Using the application
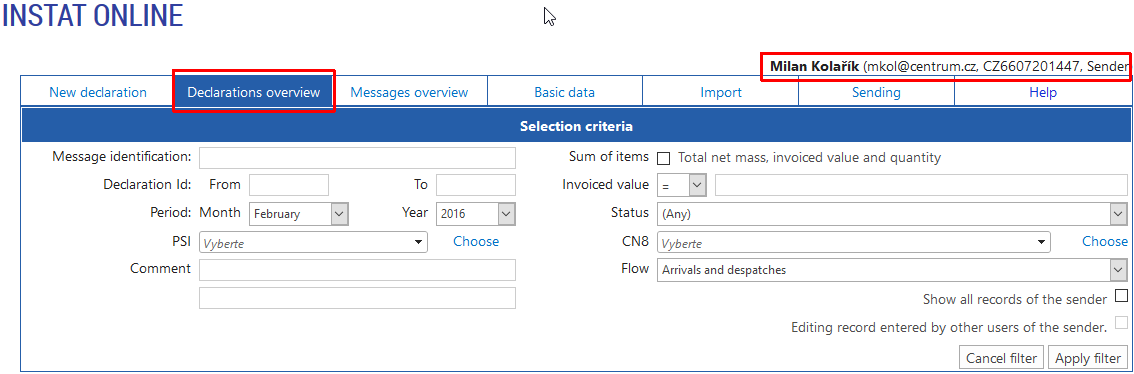
4.1 Main screen
After entering the application the tab "Declarations overview" is displayed with the logged user - user name can be changed as is described in 3.2. You can set filters for searching and then by pressing the "Apply filter" button you can find the records (declarations) matching the filter criteria. The tab "Declarations overview" will be discussed in more details in section 4.4.
Pic. 12. Main screen (initial)
4.2 Basic data
The "Basic data" tab displays the details of the TDP (third declaring party) / Sender and PSIs (provider of statistical information) as they are registered at the Customs office (see the registration described in 2.2). You cannot change the data from the application except for the contact information such as contact person, phone and fax, in case of a sender you can change even a contact email. By updating the data you can enable a quick way how to contact you if problems arise. Changes of other items can be made only by means of a registration form (see 2.2).
4.2.1 TDP (third declaring party) / Sender
This option shows the details of the TDP / Sender as it is registered at the Customs office. You can change only contact information as indicated in 2.4. If the PSI reports for himself he is displayed here as the TDP.
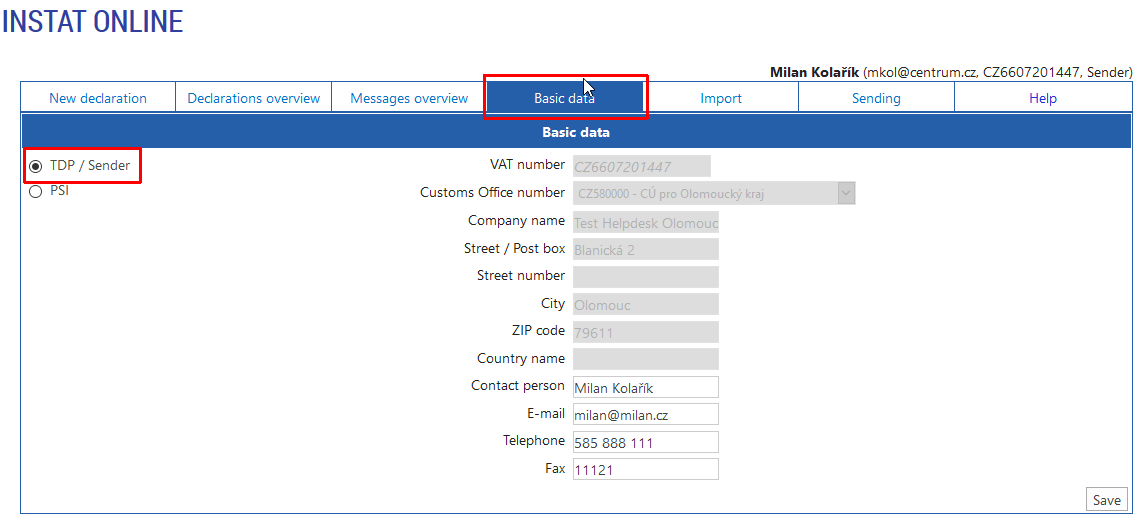
Pic. 13. Option TDP / Sender
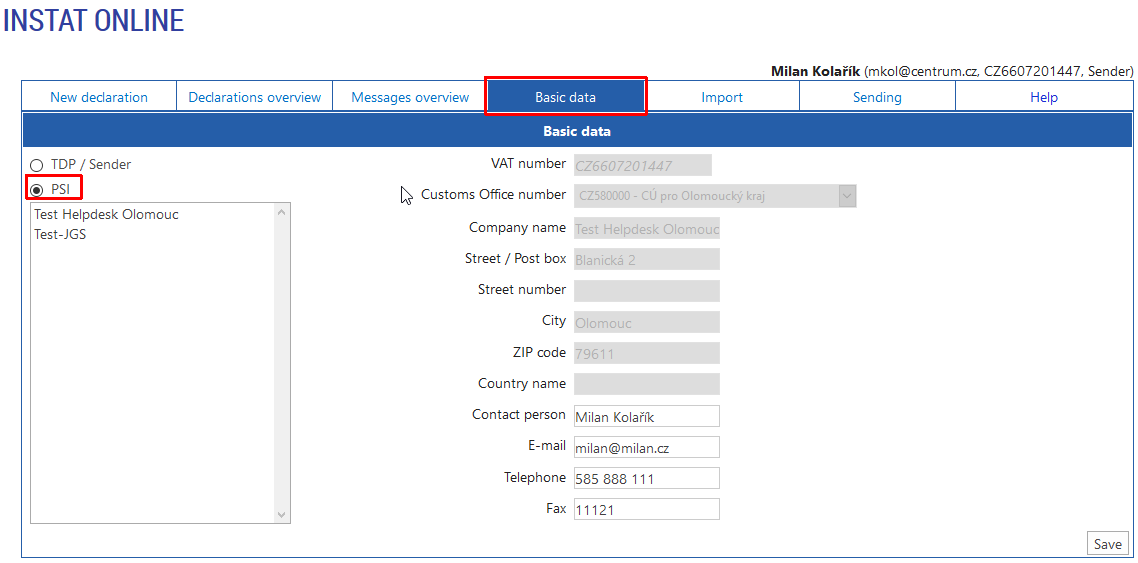
4.2.2 PSI (provider of statistical information)
This option displays the information about a PSI who is the subject obliged to report Intrastat declarations as it is registered at the Customs office. The TDP mentioned in paragraph 4.2.1 can send declarations for more PSI units, then you can see more than one PSI.
Pic. 14. Option PSI
4.3 New declaration
Through the tab "New declaration" you enter the form for manual completing of Intrastat declarations. Intrastat declarations fields are filled out in accordance with existing regulations for the given year published by the CZSO (Czech Statistical Office). These documents can be downloaded from the CZSO website (www.czso.cz). The application has a built-in codes which are also published by the CZSO but are also available on the website customs administration in the main menu "Aplikace" -> "??seln?ky" set "Sada" to "Intrastat". Here follows a description of individual fields and control components. Fields that have no other function than to select a value from the codes or to write values directly into the field will not be described because the content is described by legislation.
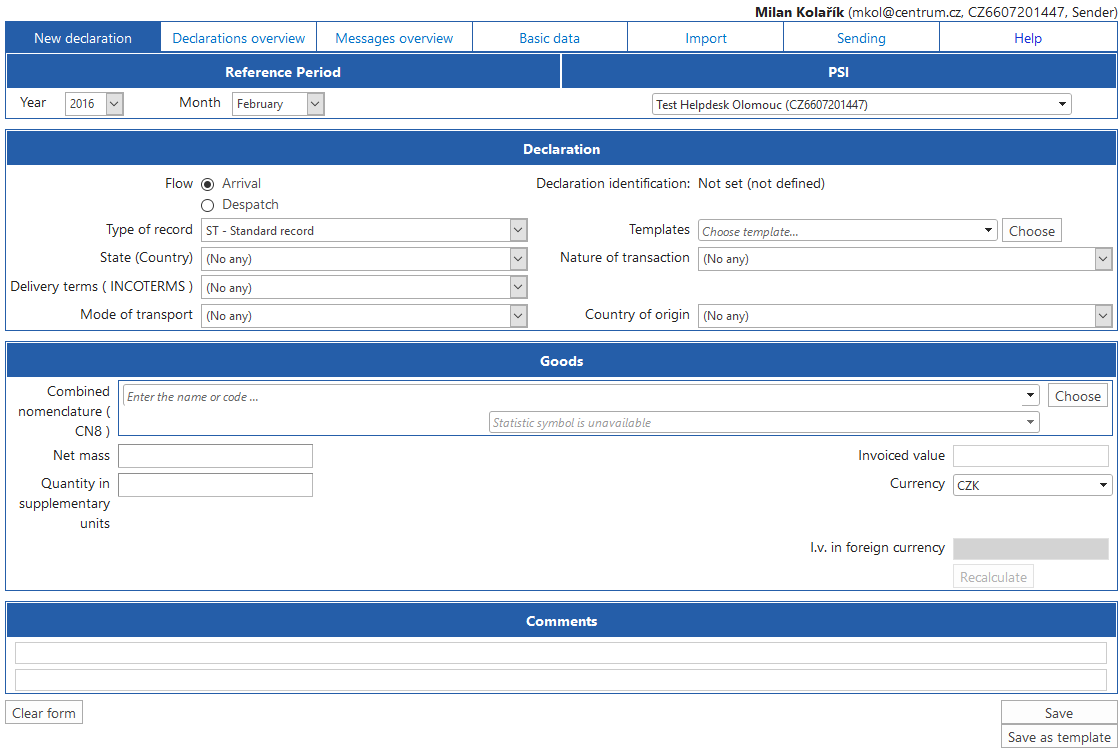
Pic. 15. Completing a new declaration
4.3.1 Reference period
You enter the period for which the Intrastat declaration is reported. The program usually offers the previous month as declarations are frequently reported the next month after the reference period (month). You can enter additional reports for any previous month.
4.3.2 PSI (Provider of statistical information)
Select the PSI. In case that you report only for yourself the field is automatically filled out. In the case that you are the TDP for more PSIs the field is blank and you must choose the PSI from the combo box. If there is no PSI selected the "Save" button is not available!

Pic. 16. Selection of the PSI
4.3.3 Type of record (special movement)
- Usually you fill out "ST" which means standard declaration which is used in the most cases.
- You fill out the "NN" code in case of a negative declaration (nil declaration). This code is used if the unit has the reporting obligation in a given month but no trade was realized. After entering this code the program creates the negative declaration stating only the year, month, flow (if it is a negative declaration for arrival or dispatch) and PSI which reports the negative declaration.
- Other codes are less common and the rules for their use can be found in the relevant legislation.
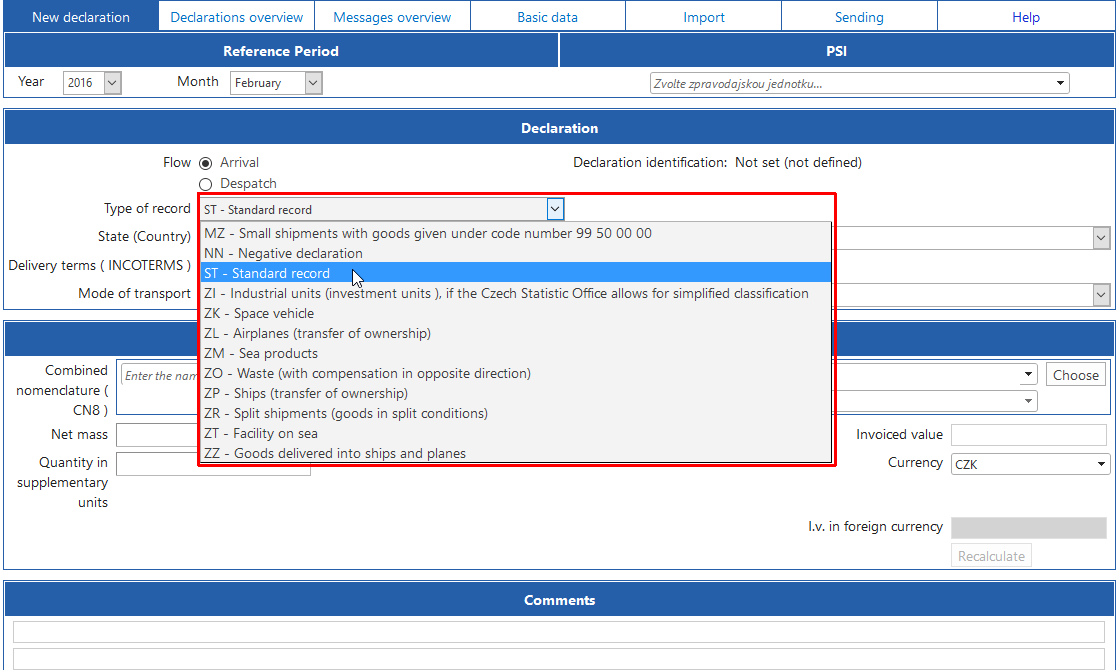
Pic. 17. Selecting the type of record
4.3.4 Templates
There is a possibility to select your pre-saved template which is saved with your chosen name and holds many items for your frequently used trade goods and transfer them to the current declaration or vice versa.
4.3.4.1 Loading from a template
Template can be loaded to the actual declaration (form) by clicking on the combo box or by clicking on the button "Choose". If you click on the button "Choose" you have more possibilities like "Edit" template or "Delete" template.

Pic. 18. Loading the template

Pic. 19. Extended options by clicking on the button "Choose"
4.3.4.2 Saving a template
You can save a template after completing the form (declaration) by pressing the button "Save as template." This must be done before saving the form. In the next dialogue you will be asked to name the template.
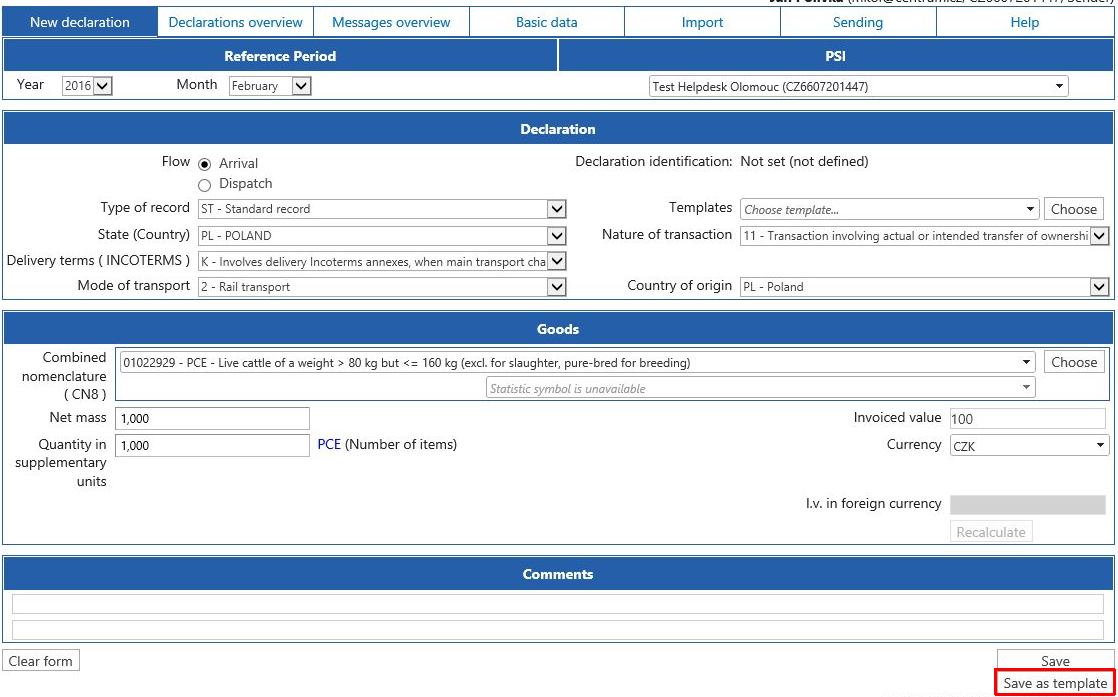
Pic. 20. Saving the template
- Notice. The template is not linked to the reference period so it may happen that the previously saved template contains data that is no longer valid for the actual period (does not match the actual codes for the reference period).
4.3.5 Combined nomenclature (CN8) code and statistical sign (additional goods code)
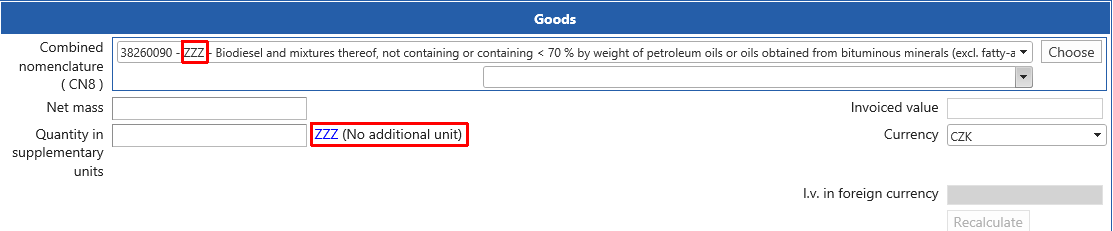
This combo box allows us to select 8-digit code of the combined nomenclature of goods published by the Czech Statistical Office (originally published by Eurostat). Here you can see also a unit of measurement for every CN8 code (ZZZ means unspecified supplementary unit of measurement). In the search box, you can enter a text (the substring is searched) or digits (all numbers beginning with the entered digits are searched). For example: if you enter "38" the searching will find all numbers beginning with 38, if you enter "horse" the searching will find all goods with the description containing the "horse" text. In case the statistical sign (additional goods code) is required you will be notified in this field in red lettering and then you have to choose one (statistical sign is additional goods code distinguishing some items (usually oil and spirit products). An alternative is to use the "Choose" button with a similar functionality.
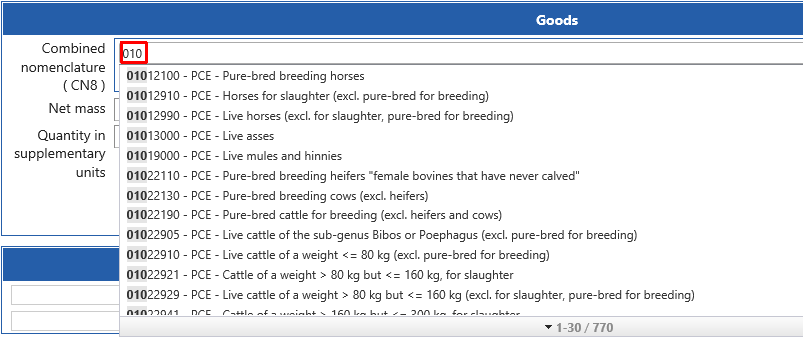
Pic. 21. Searching by the first part of CN8 codes
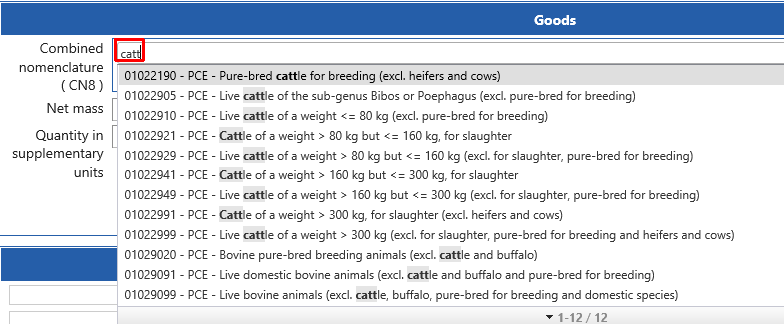
Pic. 22. Searching by the substring of descriptions

Pic. 23. Reminding you to enter a statistical sign

Pic. 24. Selecting the statistical sign
4.3.6 Net mass
It is a number with 3 decimal numbers after the decimal point. If the net mass is less than 1 you have to use decimal numbers (e.g. 0.326) if the mass is greater than or equal to one the net mass is rounded up to the whole numbers and supplemented with zeroes after the decimal point(e.g. 3.401 => 3.000). If we declare electricity or radioactive substances (CN8 beginning with 2844 or 2716) we use the constant 0.001.
4.3.7 Quantity in supplementary unit
It is a number with 3 decimal numbers after the decimal point. If the quantity is less than 1 you have to use decimal numbers (e.g. 0.326) if the quantity is greater than or equal to one the quantity is rounded up to the whole numbers and supplemented with zeroes after the decimal point(e.g. 3.401 => 3.000). Unit of measure is specified for a particular goods in CN8 codes (see the previous section). If the unit of measurement is "ZZZ" (unspecified) the quantity value must be always "0.000" in the other cases the quantity must be non-zero value (at least "0,001"). In case it is the whole number it is necessary to add three zeroes following the decimal point.
Pic. 25. Enter the quantity in the supplementary unit
4.3.8 Invoiced value
It is an integer (whole number) indicating the value of goods in the CZK. In case you have the invoiced value in a foreign currency it is possible to make a conversion. The application contains always the actual exchange rate (exchange rates for customs purposes) for the currency. By default you can fill out the invoiced value in CZK (see Pic. 26). If you know the value in foreign currencies, such as EUR, select the currency from the drop-down list (see Pic. 27). The "invoiced value" becomes inaccessible and instead it is possible to enter the "(I)nvoiced (v)alue in foreign currency". After entering the value of the selected currency, press "Recalculate" (see Pic. 28) and the converted value is transferred to the "Invoiced value" (see Pic. 29).
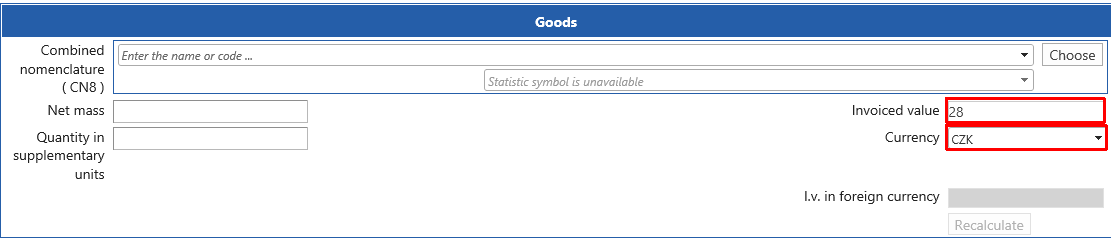
Pic. 26. Entering directly the invoiced value in CZK

Pic. 27. Selection of the foreign currency

Pic. 28. Enter a value in the foreign currency and press "Recalculate"

Pic. 29. Recalculated value
4.3.9 Comments (Notes)
For each declaration you can add two comments (notes) that will be saved. In the "Declarations overview" you can filter records by comments - the typical usage might be entering the invoice number in the comment (note) and then filter all messages from a single invoice (see 4.4.1.5).

Pic. 30. Entering comment in a declaration
4.3.10 Saving declaration
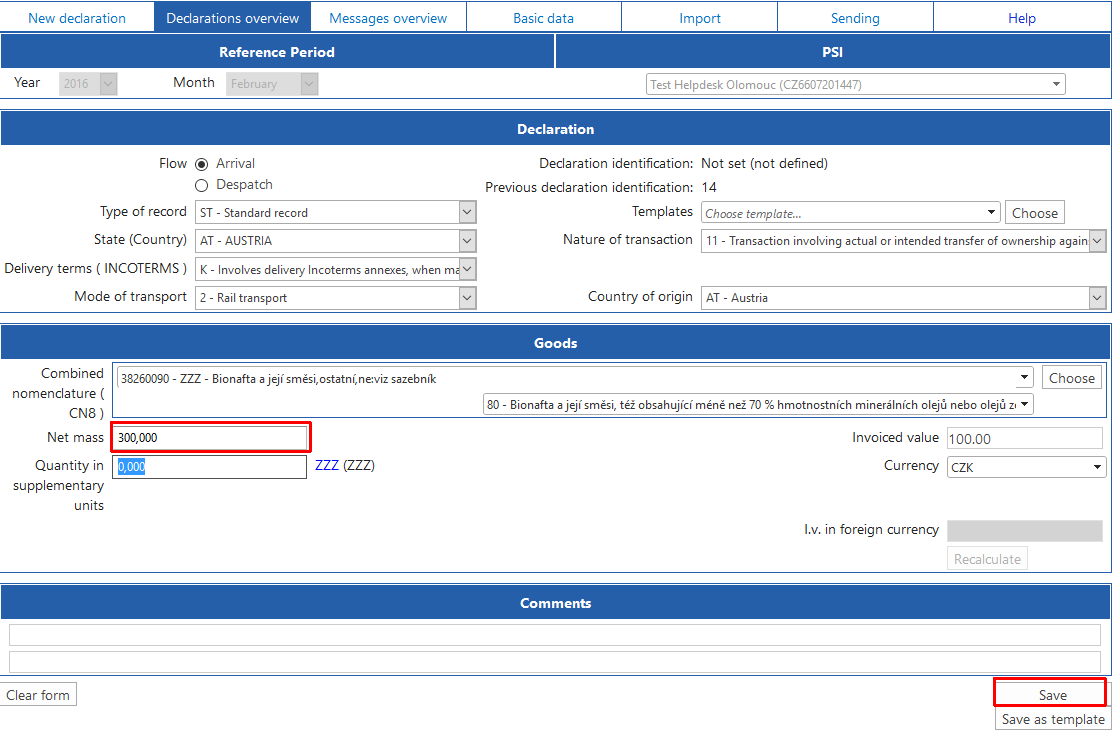
For saving the declaration press the button "Save". If you want to save the declaration as a template use the "Save as template" before pressing the button "Save". The "Save" button is available only if you already selected a PSI. After pressing the button "Save" validity checks are completed and if everything is OK the declaration is saved. If the declaration contains errors you will be notified about them and the errors have to be fixed before saving the declaration. After saving the declaration you will see the dialogue in which you can move on to a new blank declaration or you can create a declaration with the acceptance of the values saved in the previous declaration or you can navigate to the "Declarations overview" (see Pic. 31).

Pic. 31. Errors notices

Pic. 32. The dialogue after saving a declaration
Important! Declarations are saved only in your data space (in one server). For delivery to the Customs Administration you need to send declarations to the second server (see option "Sending").
4.3.11 Declaration identification (position)
After saving the declaration is assigned a number that is part of the declaration identifier. The only requirement for the position number (declaration identification) is to be unique for the given VAT number and reference period. Thus position numbers need not have to create continuous uninterrupted series of numbers.
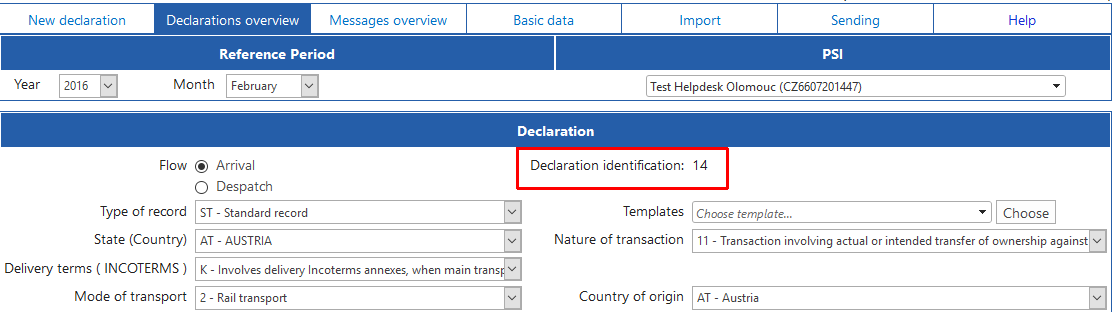
Pic. 33. Declaration identification (position)
4.4 Declarations overview
In this menu you can work with the declarations filled out (or imported) according to Section 4.3. In this menu you can view the declarations by the filters you set, correct them, delete them or export them to CSV file.
4.4.1 Filter of declarations
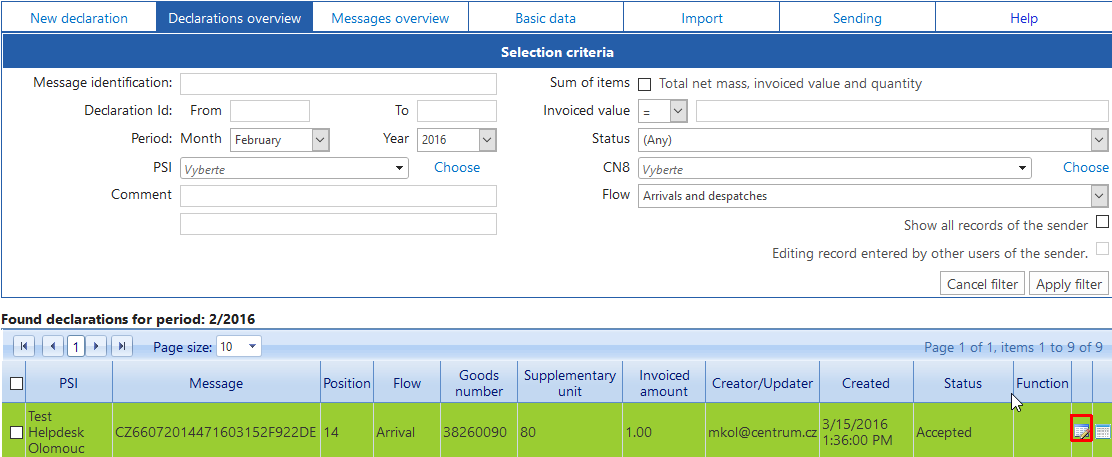
This menu is opened automatically when you enter the application. No data are displayed in order not to burden the server system. The last month is set as an initial filter criteria (default filter). Press the button "Apply Filter" and you can see the appropriate data (see Pic. 34). By setting multiple filter criteria the selection is narrowed because the individual filter criteria apply together (logical product). To erase all filter criteria use the button "Cancel filter" and the filter will be set to default. See the example of filtering Pic. 34: there are selected three rows from February where the PSI unit is the "Test ..." and the flow is "Arrival" while the invoiced value is greater than 5000 and the status is received (accepted).

Pic. 34. Example of the filtering
The following points describe the different criteria for declarations filtering.
4.4.1.1 Message identification (Message)
The identification of the XML message in which the declarations message (file) was sent. More in chapter 4.5.
4.4.1.2 Declaration Id. From - To
Filtering by declaration identification (position), described in section 4.3.11.
4.4.1.3 Period Month - Year
Filtering by reference period (month) of declaration
4.4.1.4 PSI
Filtering by a PSI (provider of statistical information)
4.4.1.5 Comment (note)
Filtering by your comment (note) (see section 4.3.9.)
4.4.1.6 Sum of items
By checking this box you can require the total sum of the net mass, quantity in supplementary unit and the invoiced values of your filtered records in the form footer.
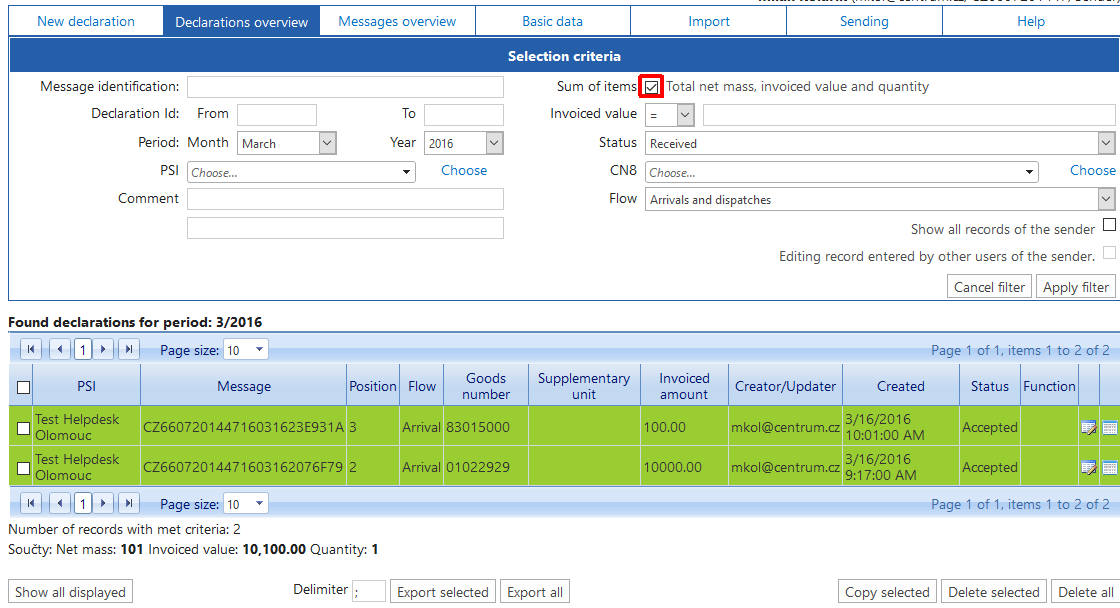
Pic. 35. Sum of values for your filtered records
4.4.1.7 Invoiced value
With filtering by invoiced value you can use mathematical operators.
4.4.1.8 Status
Filtering by the status (statuses are described in the section 4.4.2)
4.4.1.9 CN8
Filtering by the CN8 (8-digit combined nomenclature)
4.4.1.10 Flow
Filtering by the flow (Arrivals or dispatches)
4.4.1.11 "Show all records of the sender" and "Editing record entered by other users of the sender"
The application usually displays data entered by the actual logged-in user. If you have more users who have access to the application as TDPs/senders you can use these check boxes. There are cases where it is necessary to review and correct the data entered by other users. In the case you need only view data check the "Show all records the sender" if you need to edit the data check also the "Editing records entered by other users of the same sender".
4.4.2 Statuses of declarations
The declaration can have few different statuses during the process of Intrastat data collection. Statuses are expressed by different colors of the background when displaying the records.
4.4.2.1 New declaration (Not sent)
When saving a declaration (see 4.3.10) the declaration is saved as a new declaration to your user space on the server but the Customs Administration has not received it yet. Before sending a declaration(s) you can delete it or correct it arbitrarily. The declaration has no "Message identification" because it has not been sent yet and thus it does not belong to any XML message (file).

Pic. 36. A new declaration
4.4.2.2 Sending
When you are sending declarations (see 4.7) these declarations are inserted into the XML message (file) and get the message identifier (4.4.1.1) and then the declarations have the status "Sending". This status indicates that the XML message (file) which contains the declaration was already sent but it is not yet known if the XML message (with declarations) is accepted, accepted with a warning or rejected due to errors. The XML message is in the queue on our server waiting for processing or is just being processed. Usually after few minutes you can refresh the page in the browser to obtain the changed status (in most browsers you can press the "F5" key to refresh the page). If the queue with waiting XML files is long it may happen that you can wait a longer time till the XML file is processed and status of your file (declaration) is changed. Of course it is possible to send declarations, log out and check the status of your sent file later or the next day. When the declaration has the status "Sending" and the final result of processing is not yet known it is not possible to correct or delete declarations. We recommend to monitor processing statuses in the "Messages overview" (see 4.5.3).

Pic. 37. Sending declaration
4.4.2.3 Accepted
It is the final status of the declaration processing, all validity checks were performed without errors. This status is a confirmation of receipt of the declaration by the Customs Administration. Now the declaration can be corrected or deleted if it is needed.

Pic. 38. An accepted declaration
4.4.2.4 Accepted with warning(s)
The declaration is accepted by the Customs Administration (the same as in 4.4.2.3). There is only warning because of a probability of error. In that case you have to determine whether it is an error or it is OK. If the declaration is correct no action is required on your part. If you find inconsistencies in the declaration you have correct them. You can find the description of the warning by clicking on the icon "Detail" in the declaration (see Pic. 39). Description of warning is displayed in the form (see Pic. 40 - red border).

Pic. 39. Accepted with warning(s)
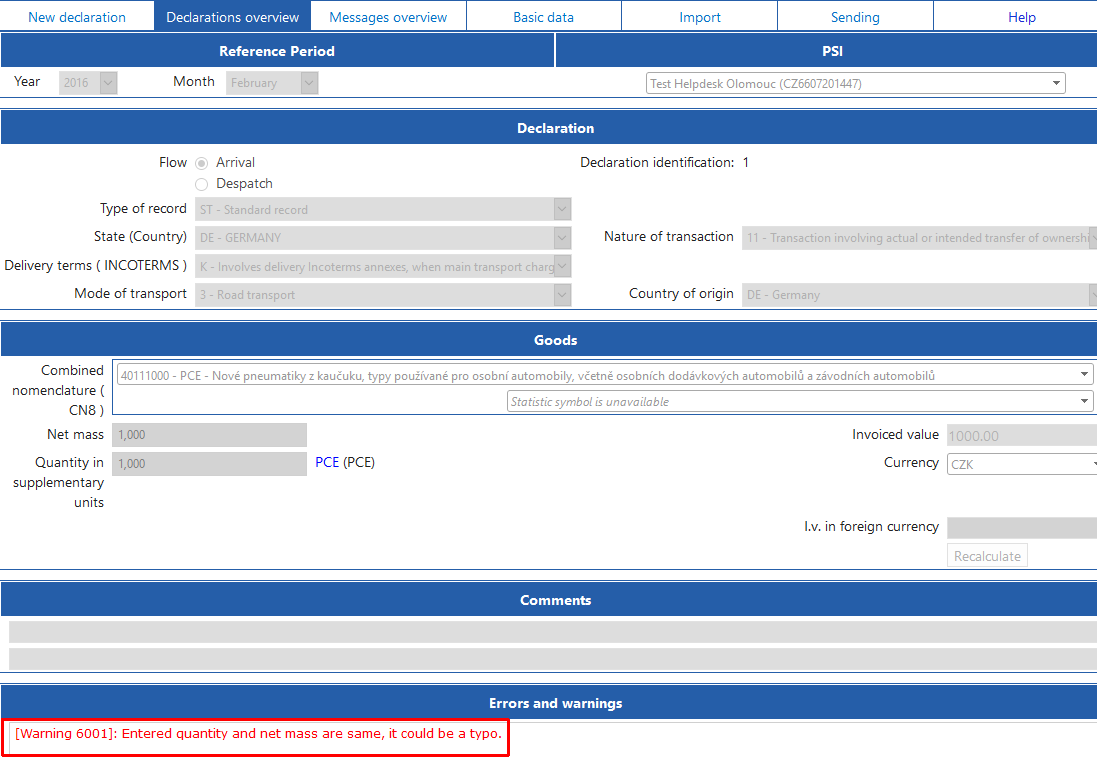
Pic. 40. Description of a warning
Note In that case one piece weighs one kilogram but it could be true in many cases and the correction would not be necessary.
4.4.2.5 Rejected and Rejected with warnings
This status indicates that the XML message has been rejected either because a declaration contained a serious error or another declaration had an error (in the same XML file). A declarations file (XML message) is rejected even if only one declaration has an error. You can make corrections by clicking on the icon "X" on the right side of the line in the "Messages overview". The records from that file will be transferred as new records and you can correct them in the "Declarations overview". You can find the description of the warning or the rejection by clicking on the icon "Detail" in the declaration (see Pic. 39). Description of rejection or warning(s) is displayed in the form (see Pic. 42 - red border).

Pic. 41. Rejected with warning(s)

Pic. 42. Description of rejection and warning
4.4.3 Corrections and deletion of declaration(s)
These operations can be performed on the declarations with the status "New" (see 4.4.2.1), "Accepted" (see 4.4.2.3), "Accepted with warning(s)" (see 4.4.2.3) and "Rejected" (see 4.4.2.4). The deletion will be described in detail with "Accepted" and "Accepted with warning(s)" declarations.
4.4.3.1 A correction of a declaration
In the "Declarations overview" you can find the declaration you want to correct. Click on the "Correct" icon (see Pic. 43). The form opens for correction you can correct values (rewrite them) and save them (see Pic. 44). This will create a new corrected record (Pic. 45) which has to be sent. Since the corrected record is a new record it has to be sent to our server. After you have corrected all records which has to be corrected you can send them all in one file. Only new corrected records are sent in a new XML message (file). So you should see in a new file just as many sentences how many records you corrected or deleted.
Pic. 43. A correction is made by clicking on the icon "Correct"
Pic. 44. Do the correction and save it

Pic. 45. A corrected record ready for sending
Important You cannot correct a reference period and change the PSI if you already sent the declaration. If you want to correct this type of error use the "Copy selected" button described in section 4.4.4.
4.4.3.2 A deletion of a declaration
Deletion can be done in two ways but the effect is the same.
- By checking off items (records) for deletion
You can use it if you delete a few records which you can see on one page. You can conveniently use the button "Select all displayed" (or Clear the selection) which selects or clears a selection of all visible records. By choosing the different "Page size" option you can increase the number of lines per page. The actual deletion is done by pressing button "Delete selected" (see Pic. 46). The deleting records are created (see Pic. 47) which must be sent to the server of the Customs Administration.

Pic. 46. Deletion of selected records by checking off and using the button "Delete selected"
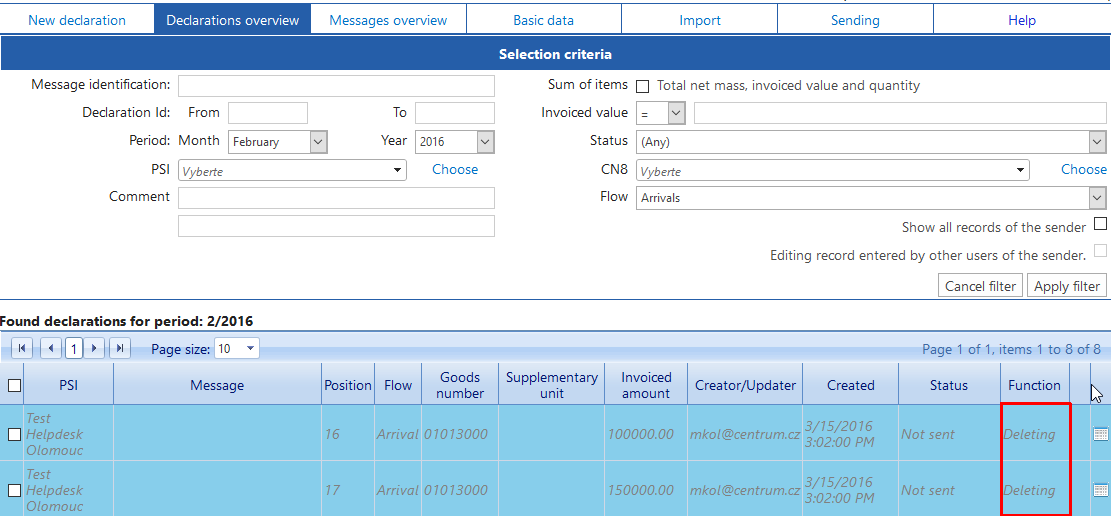
Pic. 47. Deleting records created after the deletion of two records
- By filtering and using the button "Delete all".
Usually we use this option when you delete many records which you cannot see in one page. You can filter the records you want to delete according to 4.4.1., then press "Delete all" button and all records (declarations) that meet the filter criteria will be deleted even if you cannot see them on one web page. On the Pic. 48 you can see that by pressing the "Delete all" button all 26 new declarations from January 2016 will be deleted and because they are new and yet unsent declarations they will be definitively removed from the database without creating deleting records.
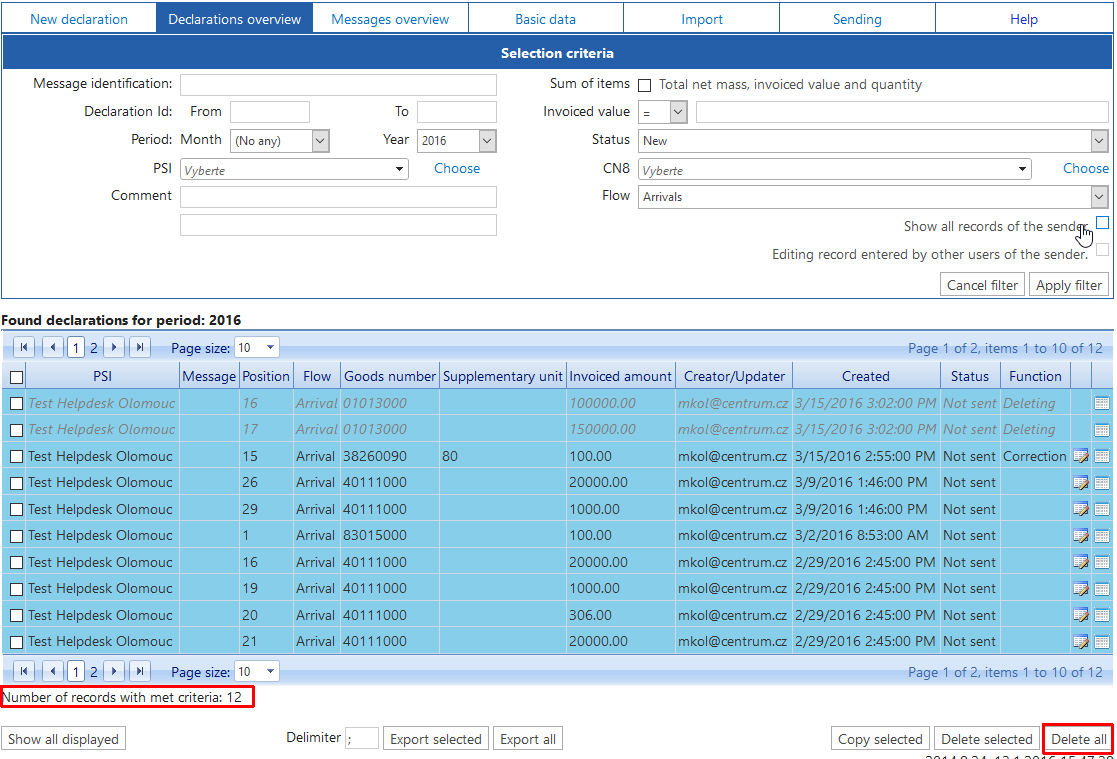
Pic. 48. Deletion of filtered records by pressing the button "Delete all"
Note By deleting of the unsent correcting/deleting record the records (declaration(s)) are returned back to its original state "Accepted". This functionality can be used if the declaration was deleted by mistake and still not sent.
4.4.4 Buttons "Export all" and "Export selected"
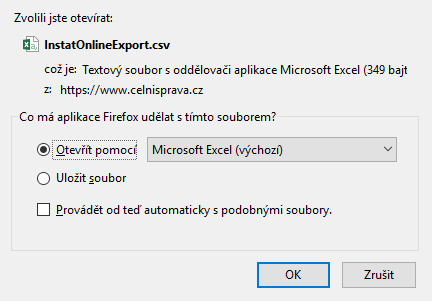
The "Export all" button allows you to export all filtered rows to a CSV file. By clicking on "Export selected" button you export only those records that have been selected by checking off the certain records (see Pic. 49). By pressing the appropriate button you open the system dialogue to open/save the file (see Pic. 50). When you select "Open in Excel" you can open the file in the table as shown in Pic. 51. This function can be used for example to create your own reports or edit the file and re-import it. Values in the table are organized according to the established order according to the document "Structure of the import CSV file", which is described in chapter 4.6. "Import".

Pic. 49. Selection of records for export
Pic. 50. Dialogue for opening/saving the file

Pic. 51. CSV file opened in Excel
4.4.5 Button "Copy selected"
This function allows us to copy the selected declaration to other reference periods. Declarations can be copied with various statuses to different periods. The copied declarations are always with a status "New". At first you have to select declarations and then press "Copy selected". It will open the dialogue for selecting the reference period where you want to copy the selected declarations. After the records are successfully copied to the reference period the confirmation appears. Declarations are copied to the corresponding month with the status "New".

Pic. 52. Selection of declarations for copying

Pic. 53. Selection of the reference period for copying

Pic. 54. Confirmation about a successful copying

Pic. 55. Declarations are saved as "New" in the reference period
Tip for usage: This can be used for example when you entered an incorrect reference period to declarations which are already sent. You can copy declarations to the correct reference period and send the corrected declarations. In the next step you have to delete declarations with the wrong reference period and send the deleting records too (see section 4.4.3.2).
4.5 Messages overview
4.5.1 What is a message (XML file)
The message (XML message) is a file which contains more declarations (records) which are included in the message. When you create the new XML message the declarations included into this XML file are new declarations which are not already part of another file. This file is assigned the "message identifier". The identifier is combination of the VAT number of a PSI + system time of the creation of the file (the time part is in a hexadecimal form). One XML message (file) can contain declarations for one PSI and for one reference period - so the application will create as many messages as there are different reference periods and various PSIs and these files (messages) will be offered for sending. The message (XML file) can be accepted only completely if even one declaration is wrong the entire message is rejected with all contained declarations. The process of sending is described in Section 4.7.
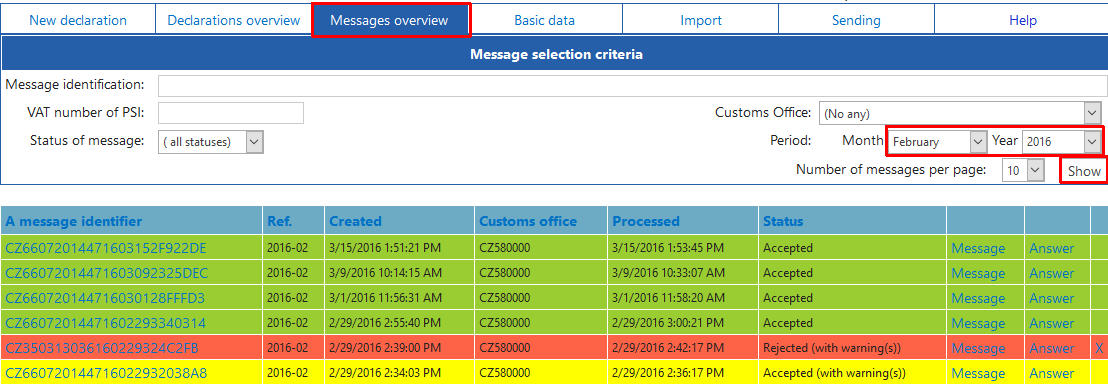
4.5.2 Messages overview form
On the Pic. 56 you see "Messages overview". You enter the form by clicking the "Messages overview". After entering this menu no messages are displayed. First of all you can specify filtering criteria and press "Show". On the picture we have selected all messages with the reference period February 2016.
Pic. 56. Messages overview
Filtering criteria:
- Message identification (see 4.5.1)
- VAT number of PSI
- Status of message(s) - Sending, Accepted, Rejected, Error (Error is a status when there was a problem during data transfer - the line has an orange background - in that case contact the Intrastat helpdesk). Statuses are described in details in the section 4.5.3.
- Customs office - Customs office to which the declarations are submitted
- Period - reference period
- Number of messages per page - determines how many messages will be displayed on one page, the default value is 10
4.5.3 Statuses of messages
Individual statuses of messages correspond to the declaration statuses described in Section 4.4.2. To retrieve the actual status of messages from the server you have to press the "Refresh" (F5). Status is also updated when you re-enter the overview. Processing of sent data and thus changes from one status to another status may take a time, particularly at the time when many messages are processed (the culmination of data collection) - it is good to send a message, log out and check the status a few hours later or the next day.
4.5.3.1 The new message and monitoring of the processing status
Immediately after creating a message (file) and sending the message acquires a message status "Before sending" (see Pic. 57).
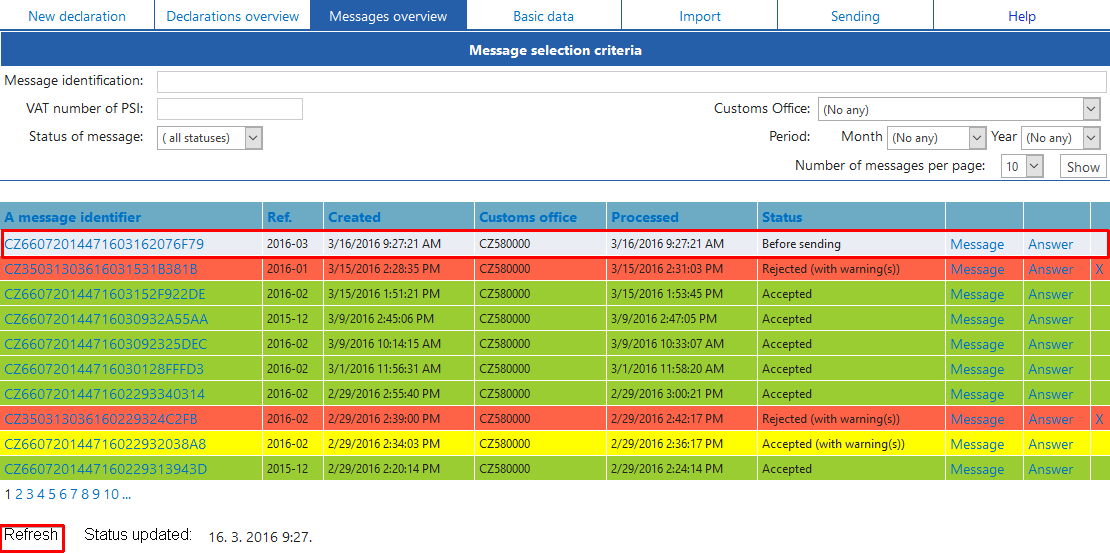
Pic. 57. Message "Before sending"
The next status is "Sending".
Pic. 58. Sending
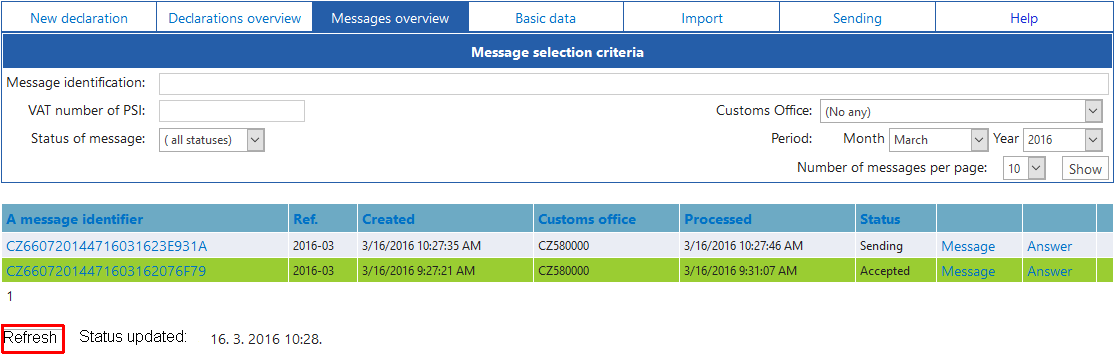
4.5.3.2 Accepted
The message is successfully accepted at the Customs Administration server (see Pic. 59).

Pic. 59. Accepted message
By clicking on the link "Answer" you can view and print the response from the Intrastat processing centre (see Pic. 60). The function ID code "ACK" means "acknowledged".

Pic. 60. Answer from the Intrastat processing centre
4.5.3.3 Accepted with warning(s)
The message is successfully accepted at the Customs Administration server (see Pic. 61) and has at least one declaration with a warning of a possible error (see section 4.4.2.4).

Pic. 61. Accepted message with a warning(s) about a possible error
By clicking on the link "Answer" you can view and print the response from the Intrastat processing centre. This response contains warning(s) about possible error(s).
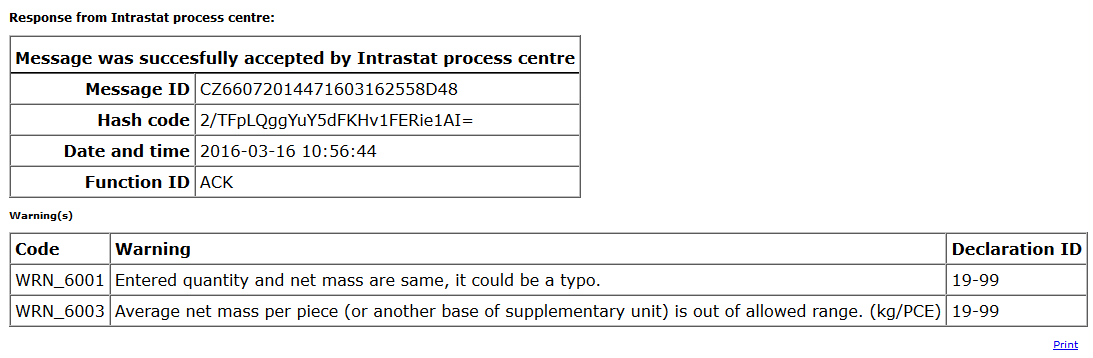
Pic. 62. Response from the Intrastat processing centre with warnings
4.5.3.4 Rejected
In the environment of InstatOnline application it is rare condition since the application contains always the actual codes which are used for validations so the entered data are validated when you save the declarations. The whole message is rejected even if only one declaration is erroneous. The contents of such a message is not accepted so can make corrections and send the corrected message again. The message can also be erased using the "X" sign at the end of the line in the "Message overview". The erased declarations will be accessible in the "Declaration overview" for corrections and sending. Reasons for rejection are in the "Answer", click on the link "Answer". If you do not understand the reasons for rejection, contact the Intrastat helpdesk. In the event that rejected message contains at least one warning the message is marked as "Rejected with warning(s)".

Pic. 63. Rejected message
4.5.3.5 Error
An "Error" state of a message is caused by technical fault during the processing of the message, the message has an orange background. In this case always contact Intrastat helpdesk.
4.5.4 Link to declarations included in the message
You can display declarations in the given message by clicking on "Message identification" (name of the file) in the message list (see Pic. 64). This click opens the "Declaration overview" which is automatically set to filter declarations according to the message identifier (Pic. 65). Then apply filter.

Pic. 64. Click on the message identification
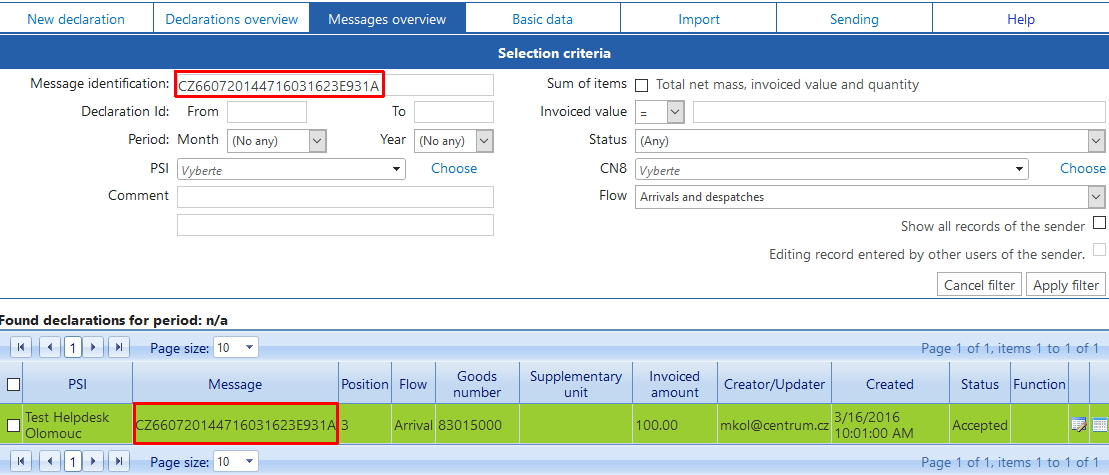
Pic. 65. You are switched to the "Declaration overview" and the filter is set
4.5.5 Displaying XML file
When you are sending the declarations the application InstatOnline creates an XML file which is sent to our Intrastat processing centre. This file can be viewed, printed or saved. You can open the file by clicking on the "Message" (see Pic. 66).

Pic. 66. The link "Message" for displaying the XML file (message)

Pic. 67. Display of the first part of the XML file in a browser
4.6 Import
4.6.1 Rules for importing files
Through this menu you can import declarations in CSV (comma separated value) format from external sources which can be your accounting system and so on. The import CSV file must meet the specified format description (see Pic. 68). The file can be in plain text csv format or can be compressed in zip file or other compressed formats (.gz, .gzip). You can choose your own delimiter, as the default delimiter is used the semicolon. The imported file is for technical reasons limited to 500 rows for each PSI and the reference period. In case you regularly exceed that limit you should use the InstatDesk-CZ application instead. In justified cases the Intrastat helpdesk can increase your import limit for the reference period.
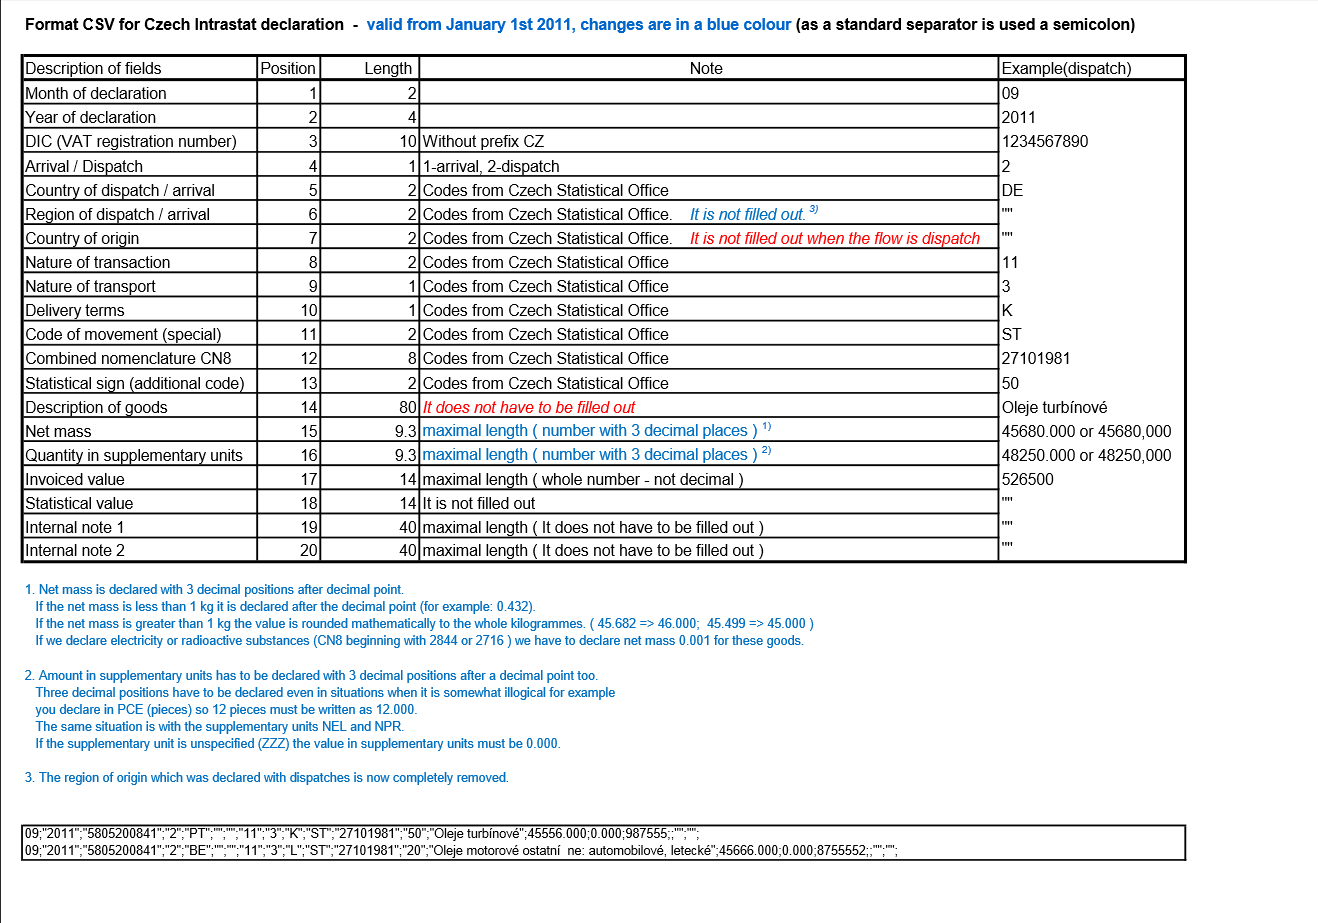
Pic. 68. Structure of the import CSV file
4.6.2 Import of files
You can find the import function in the menu "Import". In this menu you can find information about your import limit (if you have two PSIs 2 * 500 = 1000). There is the "Browse" button to select the import file and the field where you can specify the character of delimiter (default is a semicolon) and "Import" button to start importing a CSV file (see Pic. 69).

Pic. 69. Menu for importing a CSV file
At first you select the import file by pressing the "Browse" button. The file selection dialogue opens (see Pic.70) and you select the file and press "Open" button.
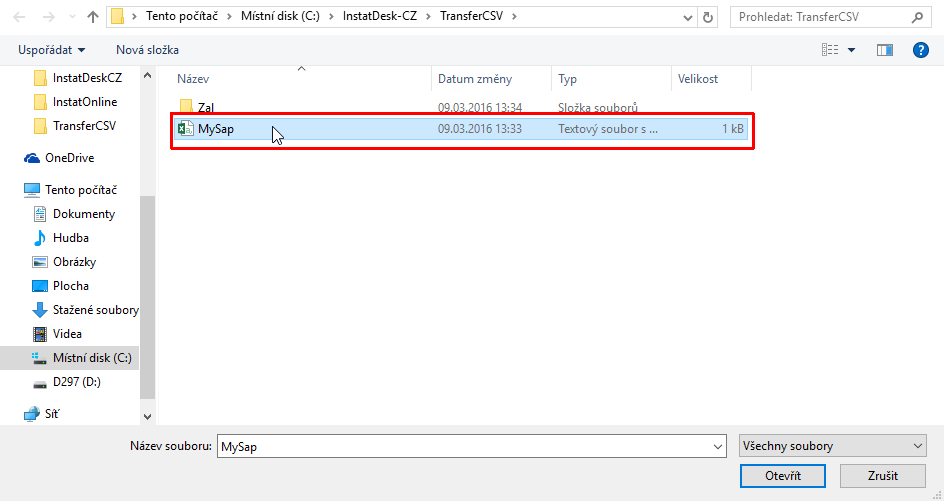
Pic. 70. Dialogue for CSV file selection
Once a file is selected you can import the file by pressing the "Import" button (see Pic. 71).

Pic. 71. Import of the file
If the imported file does not contain errors we get information about the successful import and our import limit is decreased (see Pic. 72).

Pic. 72. The successful import of the file
4.6.3 Errors in an import file
In the case that you import a CSV file, like it was mentioned in the previous section, and the file contains errors it is rejected. Errors have to be corrected either directly in the import file or through the application from which the file was exported. Common errors are usually caused by not updating the codes needed for validation in your accounting system - in this case contact the provider of your software. On the Pic. 73 you can see the error where the file is rejected due to invalid CN8 code. To see the errors it is necessary to click on the "+" button ("Show error list") after the failed import to expand the list of errors with the descriptions.

Pic. 73. Errors in the import file
4.7 Sending
The menu "Sending" is used to create the message and its subsequent sending to the server of the Customs Administration. More on creating messages is in section 4.5. After entering the menu we have two options if we want to create messages for all reference periods or to choose just one reference period - we recommend to leave the default option "All not sent declarations" and press "Show" (see Pic. 74).

Pic. 74. Selection of declarations for sending
In the next step you are offered to create messages for each reference period and each of the PSIs separately. It is necessary to check off each message and click "Send selected" button (see Pic.75). At that moment the application creates a message identifier for the file and sends the message (XML file) to the server. The processing of the XML messages can be monitored in the menu "Messages overview" (see Chapter 4.5). The application provides information about creating and sending the file (see Pic. 76) and offers either to send another message or to go directly to the "Message overview" where you can see the statuses of messages.

Pic. 75. Selection of declarations for a message creation and sending

Pic. 76. Information after the sending of the message
Important All new declarations should go through the process of sending as well as new corrected or new deleted declarations from the already sent message! For this reason we recommend to use the default option "All not sent declarations" when selecting declarations for sending. At least you can check all declarations that have not yet been sent.
4.8 Help
By clicking on the menu "Help" you can display the help for InstatOnline application.